What is a Raspberry Pi?
The Raspberry Pi is a series of small, affordable single-board computers developed by the Raspberry Pi Foundation. Originally designed to promote computer science education, it has become popular among hobbyists, makers, and professionals for various projects ranging from home automation to robotics.
Key Features:
- Affordable: Starting at just R650
- Versatile: Runs various operating systems including Linux
- Educational: Perfect for learning programming and electronics
- Community: Huge community support and documentation
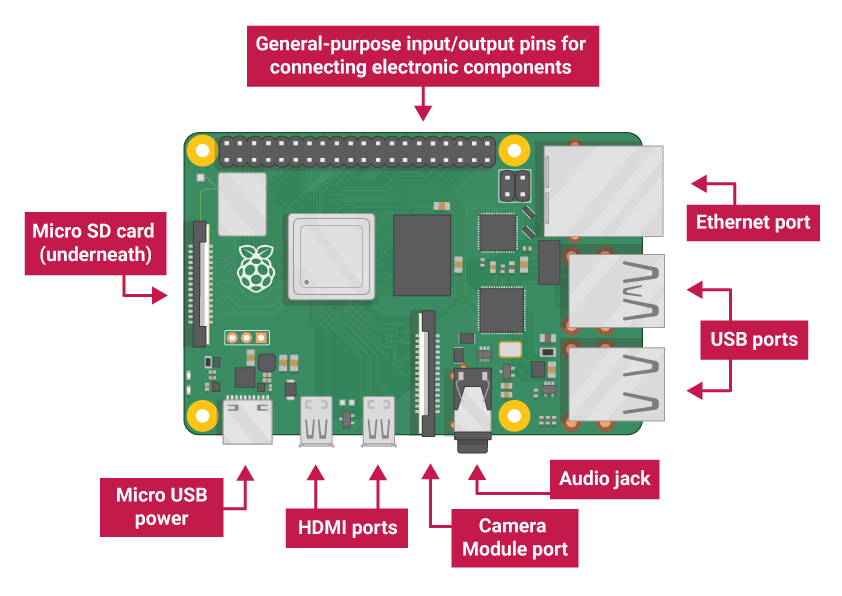
- GPIO Pins: 40 general-purpose input/output pins for hardware projects
What You’ll Need
Before diving in, let’s gather the essential components:
Required Items:
| Component | Description | ZAR | USD | GBP | CNY |
|---|---|---|---|---|---|
| Raspberry Pi 4 Model B | Main board (4GB RAM recommended) | R1,200 | $65 | £52 | ¥460 |
| MicroSD Card | 32GB Class 10 or better | R200 | $12 | £9 | ¥85 |
| USB-C Power Supply | Official 5V 3A power adapter | R300 | $16 | £13 | ¥115 |
| Micro HDMI Cable | Micro HDMI to HDMI (for Pi 4) | R150 | $8 | £6 | ¥55 |
| USB Keyboard & Mouse | Basic input devices | R400 | $22 | £17 | ¥155 |
| Monitor/TV | HDMI compatible display | Varies | Varies | Varies | Varies |
Optional but Recommended:
| Component | Description | ZAR | USD | GBP | CNY |
|---|---|---|---|---|---|
| Raspberry Pi Case | Protective enclosure | R200 | $12 | £9 | ¥85 |
| Heat Sinks & Fan | Cooling solution | R150 | $8 | £6 | ¥55 |
| Ethernet Cable | Cat6 network cable | R100 | $5 | £4 | ¥35 |
| Breadboard Kit | Prototyping board + jumper wires | R250 | $14 | £11 | ¥100 |
| GPIO Extension Board | T-cobbler for easier prototyping | R180 | $10 | £8 | ¥70 |
Where to Buy Components
💡 Pro Tip: Check for local makerspaces, universities, or electronics clubs in your area - they often have bulk purchasing programs or can recommend the best local suppliers for your region.
Setting Up Your Raspberry Pi
Step 1: Download Raspberry Pi OS
- Visit the official Raspberry Pi website
- Download Raspberry Pi Imager
- Install the imager on your computer
Step 2: Flash the OS to Your SD Card
- Insert your microSD card into your computer
- Open Raspberry Pi Imager
- Select “Raspberry Pi OS (32-bit)” as the operating system
- Select your SD card as the storage device
- Click “Write” to flash the OS
Pro Tip: Enable SSH and configure WiFi before writing by clicking the gear icon in Raspberry Pi Imager.
Step 3: Initial Boot and Setup
- Insert the SD card into your Raspberry Pi
- Connect peripherals: keyboard, mouse, monitor, and power
- Power on your Raspberry Pi
- Follow the setup wizard:
- Set your country, language, and timezone
- Create a user account
- Configure WiFi
- Update the system
Step 4: Update Your System
Once setup is complete, open the terminal and run:
sudo apt update
sudo apt upgrade -y
This ensures your system has the latest security updates and software packages.
Essential Commands to Know
Here are some fundamental Linux commands you’ll use frequently:
File System Navigation
pwd                 # Print current directory
ls                  # List files and folders
ls -la              # List files with details
cd /home/pi         # Change to home directory
cd ..               # Go up one directory
File Operations
mkdir my_project    # Create a new directory
touch test.txt      # Create an empty file
cp file1 file2      # Copy a file
mv old_name new_name # Move/rename a file
rm filename         # Delete a file
rm -r foldername    # Delete a folder and contents
System Information
df -h               # Check disk usage
free -h             # Check memory usage
top                 # Show running processes
lscpu               # Show CPU information
Your First Python Program
Python comes pre-installed on Raspberry Pi OS. Let’s create your first program:
Hello World Example
- Open the terminal
- Create a new Python file:
nano hello_world.py- Add the following code:
#!/usr/bin/env python3

print("Hello, Raspberry Pi World!")
print("Welcome to your programming journey!")

# Get user input
name = input("What's your name? ")
print(f"Nice to meet you, {name}!")

# Simple calculation
print("\nLet's do some math:")
num1 = float(input("Enter first number: "))
num2 = float(input("Enter second number: "))
result = num1 + num2
print(f"{num1} + {num2} = {result}")- Save and exit (
Ctrl+X, thenY, thenEnter) - Run your program:
python3 hello_world.pyWorking with GPIO Pins
One of the most exciting features of the Raspberry Pi is its GPIO (General Purpose Input/Output) pins. These allow you to control LEDs, read sensors, and interact with the physical world.
GPIO Pin Layout
The Raspberry Pi 4 has 40 GPIO pins:
- Power pins: 3.3V, 5V, and Ground
- Digital pins: Can be set to HIGH (3.3V) or LOW (0V)
- Special function pins: SPI, I2C, UART, PWM
LED Blink Example
Let’s create a simple LED blink program:
#!/usr/bin/env python3
import RPi.GPIO as GPIO
import time

# Set up GPIO
GPIO.setmode(GPIO.BCM)
LED_PIN = 18
GPIO.setup(LED_PIN, GPIO.OUT)

try:
    while True:
        GPIO.output(LED_PIN, GPIO.HIGH)  # Turn on LED
        print("LED ON")
        time.sleep(1)

        GPIO.output(LED_PIN, GPIO.LOW)   # Turn off LED
        print("LED OFF")
        time.sleep(1)

except KeyboardInterrupt:
    print("\nProgram stopped by user")

finally:
    GPIO.cleanup()  # Clean up GPIO settings
Wiring the LED
- Connect the long leg of the LED to GPIO pin 18
- Connect the short leg to a 330Ω resistor
- Connect the other end of the resistor to Ground (GND)
Useful Software and Tools
Programming Environments
- Thonny: Beginner-friendly Python IDE (pre-installed)
- Visual Studio Code: Advanced code editor
- Geany: Lightweight text editor with syntax highlighting
Install Additional Software
# Install VS Code
sudo apt install code

# Install Git
sudo apt install git

# Install Node.js
curl -fsSL https://deb.nodesource.com/setup_18.x | sudo -E bash -
sudo apt install nodejs

# Install Arduino IDE (for Arduino projects)
sudo apt install arduino
Project Ideas for Beginners
Now that you have the basics down, here are some beginner-friendly projects:
1Smart Home Dashboard
Create a web-based dashboard to monitor temperature and humidity using sensors.
2Security Camera System
Use the Pi Camera module to create a motion-detecting security system.
3Weather Station
Build a weather monitoring station with various sensors and data logging.
4Home Automation Hub
Control lights, fans, and other devices using relays and GPIO pins.
5Retro Gaming Console
Install RetroPie to turn your Pi into a retro gaming console.
Troubleshooting Common Issues
SD Card Corruption
- Symptoms: Boot failures, file system errors
- Solution: Always shut down properly, use quality SD cards, consider read-only file systems for headless projects
Power Issues
- Symptoms: Random reboots, undervoltage warnings
- Solution: Use the official power supply, avoid power-hungry USB devices
Overheating
- Symptoms: Throttling warnings, performance issues
- Solution: Add heatsinks, ensure proper ventilation, consider a fan
Network Connectivity
- Symptoms: Can’t connect to WiFi or internet
- Solution: Check credentials, signal strength, try ethernet connection
Next Steps and Resources
Congratulations! You’ve taken your first steps into the world of Raspberry Pi. Here’s how to continue your journey:
Online Resources
- Official Documentation: raspberrypi.org/documentation
- MagPi Magazine: Free official Raspberry Pi magazine
- YouTube Channels: ExplainingComputers, The MagPi, Raspberry Pi Foundation
- Forums: Raspberry Pi Forums, Reddit r/raspberry_pi
Books to Consider
- “Learn Robotics with Raspberry Pi” by Matt Timmons-Brown
- “Raspberry Pi Cookbook” by Simon Monk
- “Programming the Raspberry Pi” by Simon Monk
Advanced Topics to Explore
- IoT Projects: Connect your Pi to cloud services
- Machine Learning: Run AI models on your Pi
- Robotics: Build robots using motors and sensors
- Cluster Computing: Link multiple Pis together
Conclusion
The Raspberry Pi opens up a world of possibilities for learning, creating, and innovating. From simple LED projects to complex IoT systems, this tiny computer can handle it all. Remember, the key to success is to start small, experiment often, and don’t be afraid to break things – that’s how you learn!
The most important advice: have fun and keep experimenting! The Raspberry Pi community is incredibly supportive, so don’t hesitate to ask questions and share your projects.
Happy building! 🥧
Have questions or want to share your Raspberry Pi projects? Feel free to reach out through the contact form or connect with me on social media.